Much of the real estate agent's day-to-day is spent outside the office. .
With that in mind, CASAFARI CRM developed an APP that is the real estate agent's best friend. Check locations, interact with dynamic maps, view and add properties to your portfolio, without forgetting to manage events and leads. In addition, you can also use the digital signature after visiting a property.
Wherever you are, you can generate a Comparative Market Analysis (CMA) Report to get the fair market price and see data from similar properties.
Learn, in this article, all the features of the APP, as well as the step-by-step for you to make good use of it:
A - Login
Go to APP Store or Google Play and download CASAFARI CRM APP.
From Profile:
1. Log in to CASAFARI CRM (desktop version).
2. In the upper right corner, access your profile and click "Settings".
3. In the "APP" tab, two options for logging in will appear:

1. QR Code
Open the APP and click on the button below to scan the QR code that is presented to you in the CRM:
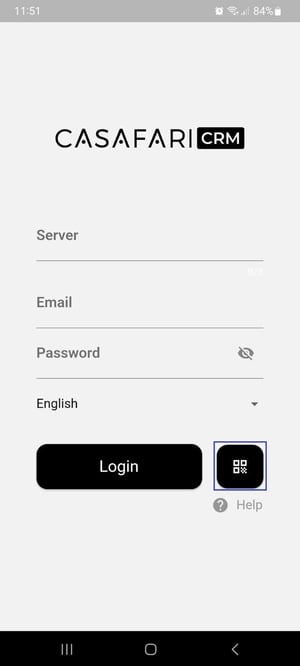
This option is best for logging into the APP if you have quick access to the desktop version of the CRM.
2. Email and Server ID:
Open the APP and fill in your email and password. Then, indicate your agency's server ID.
This information can also be found in the Settings area under the "APP" tab in the CRM.
The server ID is the same for all agency users, so if you are outside the agency and need to log in, any member of your agency can give you this information.
After filling in these details, click "Login".

From the Users area:
1. In CASAFARI CRM (desktop version), go to Users - User Data.
2. In the "APP" tab, two options for login will appear:
a. QR Code
Open the APP and click on the button below to scan the QR code presented in the CRM.
This option is best for logging into the APP if you have quick access to the desktop version of the CRM.
b. Email and Server ID
Open the APP and fill in your email and password. Then, indicate your agency's server ID.
This information can also be found in the Settings area under the "APP" tab in the CRM.
The server ID is the same for all agency users, so if you are outside the agency and need to log in, any member of your agency can give you this information.
After filling in this information, click "Login".
B - Calendar
Access an intuitive diary and keep track of your daily tasks. Don't lose sight of scheduled events, book new appointments in a few clicks, and have your monthly planning always up to date.

Event View:
1. In the calendar, view upcoming events that are scheduled. Use the filters to show you events that have already taken place.
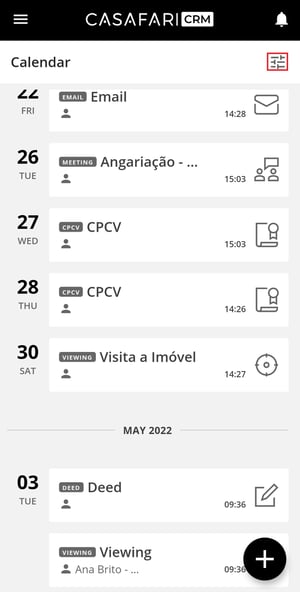
2. Filter by the last 15 or 30 days and by event type to see past events.

3. Follow the evolution of your business in the notifications area. View all alerts in the APP and mark them as read.
Event details:
1. Access the main details: view the type of event, location, access client, and property details. The start and end date and time as well as the responsible agents will also be available.
2. Add comments and notify all agents involved.
3. When the event type is “Property Visit”, click on “Signature” to obtain the digital signature of the potential client. In the properties area, click on “Feedback” and write comments about the visit, with the possibility of sending them to the property owner.

4. Also in this type of event, consult the properties associated with the visit. Navigate to them with your phone's GPS, clicking on the option “View”, in the location area.
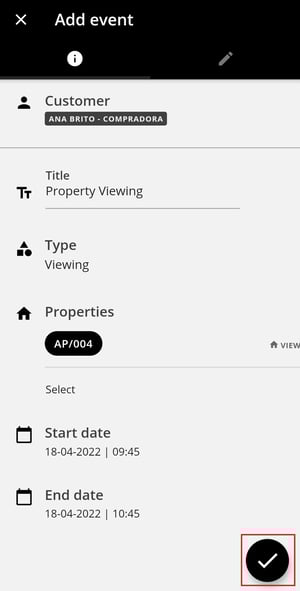
Add a new Event:
1. In the bottom right corner, click the + button to add a new event.
2. Associate the client, and property and set the type, start date, end date, and title.
3. Enter any comments in the notes if required.
4. Click the button to save.
You can access the following article to learn how to manage property viewings and how to obtain the digital signature after the visit.
C- Properties
In the APP, create new pages for your properties, identify the main features and upload photos. Easily show your portfolio to potential clients!

On property visits, access the exact location of your properties and navigate to them using your smartphone.
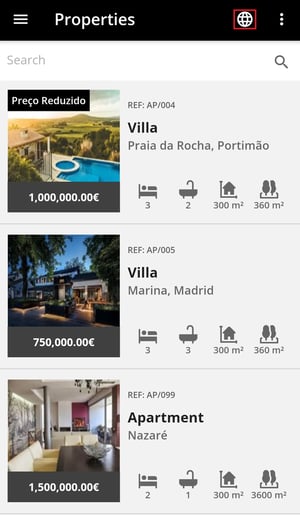
Properties List
1. Search for properties, using the filters or the free search bar. If you use the available filters, choose by property type, district, municipality, location, zone, and price range.
2. View the list of properties in the APP or activate this option to see the properties on the map.
3. Create and send a Smartlink from the property list: select one or more properties, click on Share, choose the method you want to use to share the link, then select the contact and send it:


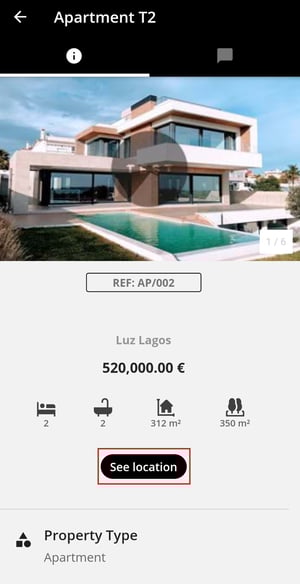
Property Details:
1. See the main data of the property (typology, gross area, construction area, photographs, details, and price).
2. Click on “View location” to access the property's GPS coordinates. Use your smartphone to see the route to the property.
3. In the “Documents” area, view the files uploaded on the property.
Add new Property:
1. In the bottom right corner, click the + button to add a new property.
2. Set the reference, price, number of bedrooms, bathrooms, and property type. Take a photo or choose images from your gallery.
3. Indicate the main features of the property by selecting the amenities.
4. Enter any comments in the notes, if necessary.
5. Click the button to save the new property.

Note:
After creating the property in the app, it is added to the CRM with the status “pending.”
It is not possible to change the property status in the app. To activate the new property, you must do so from the CRM.
D - Customers
Keep your contact base organized and interact with your clients at any time. Register new contacts so you can assign them to leads and close more deals.

Customers List:
1. Search by clients, using the filters or the free search bar. Filter by type of client or interest: Buyer, Seller, Holidays, Longterm Rental and Inactive.

2. Define your favorite clients by marking them with this symbol:

3. Import contacts saved on your phone by clicking Phone Contacts > Get Phone Contacts and Add to CRM:


Customer Details:
1. Select the customer you want to view and access the details.
2. View contacts, associated properties, origin, language, and associated agent.
3. Directly send an email to the client by clicking on the “Send” option.
4. Call*, send SMS or a WhatsApp message, on the “Contact” option.

*All phone calls made through the APP will automatically create a “phone call” event.
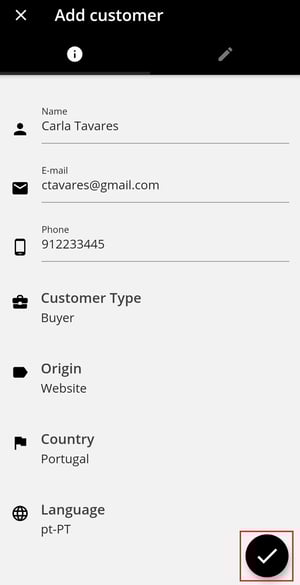
Add New Client:
1. In the bottom right corner, click the + button to add a new client.
2. Write the name, email, phone number, and client type (buyer, owner, buyer/owner, holidays or longterm rental) and define origin, country, and language.
3. Enter notes if necessary.
4. Click the button to save the new profile.
E - Funnels
1. Access the funnels created in the CRM — Sales/Listing and Custom.


2. Access the lead statuses using the arrows:

F - Leads
Optimize processes and convert leads into successfully closed deals. Share property lists with your customers and consult all the details of your business, at any time.

List of Leads:
1. Search for leads, using the filters or the free search bar. You can filter by lead type: sales or listings.

Lead Details:
1. View the lead's main data - priority, state, client, type, associated property(ies), offer value, origin, and associated agent.
2. Access the profile of the potential buyer or seller in the “Client” option.
3. Check the “View” option, in the properties area, to access the property details.
4. Insert any comments in the notes, if necessary.
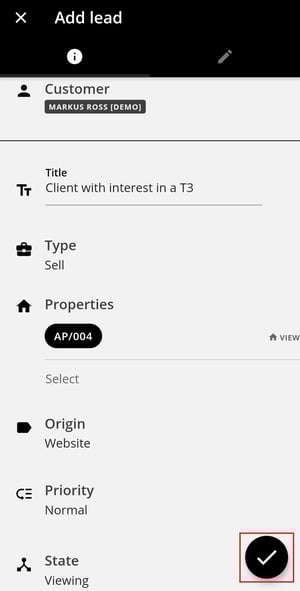
Add new Lead:
1. In the bottom right corner, click on the + button to add a new lead.
2. Associate the client, lead type (sales or listings), properties, and set the source and priority.
3. Insert notes, if necessary.
4. Click on the button to save the new lead created.
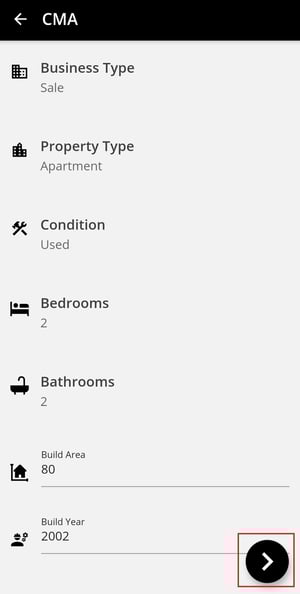
G - CMA Report
The CMA (Comparative Market Analysis) report will allow you to estimate a property's market value at a given moment by analyzing comparable property values. In seconds, you get a personalized CMA report with the most accurate market information:

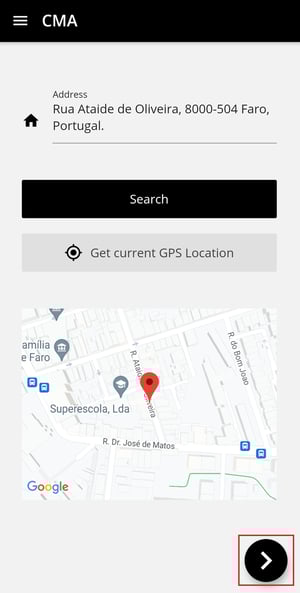
1. In the APP, check the “CMA Report” option.
2. Enter the property address or put the GPS coordinates of your current location.
3. Indicate the business type, property type, condition, number of bedrooms and bathrooms, area, and year built.
4. Indicate the main amenities of the property.
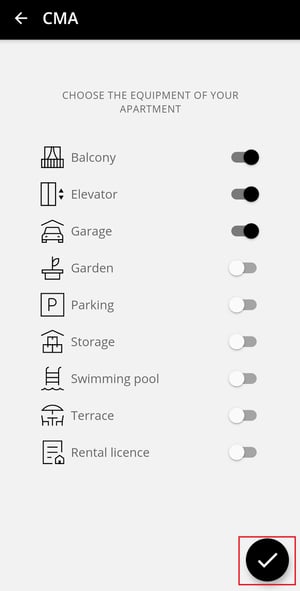
5. Click the symbol to proceed and obtain an estimate of the fair market price, minimum value, and maximum value. You can also generate a Smartlink report to send to the potential client:

Note: To be able to obtain the CMA report, you must have hired the services of CASAFARI and make the following configuration in CRM (desktop version):
1. On the top right corner, access your profile and click on “Configuration”.
2. On the tab “CASAFARI”, put your e-mail and password to access the CASAFARI system.
3. Click Synchronize and then Save.
H - CASAFARI GO
Getting new properties for your agency's portfolio is now easier!
Organize and make your prospecting actions measurable.
Through CASAFARI data, discover properties for sale by owners around you.
Get to know CASAFARI GO in this tutorial and increase your chances of attracting new properties.
I - Logout
To logout you should follow these steps:
1. Access the main APP menu and click on "Logout":

2. A message will appear on the screen so that you can confirm the exit of the application.
3. Click on "Logout":

These features are available in the PLUS and PREMIUM plans.
For more information, contact us by email: help@casafaricrm.com